Ever wanted to change an image file name after uploading it to WordPress? Image file names are important for image SEO and can help more users find your website.
While WordPress allows you to change an image alt tag and caption, there is no built-in option to change an image file name from the admin area.
In this article, we will show you how to easily rename images and media files in WordPress. We’ll also show you a method to replace media files after renaming them on your computer.

Why Rename Images and Media File Names in WordPress?
Images can help you get more traffic to your website. Particularly, if you upload original images and other media files to your website.
However, unlike text, search engines and users both need your help to describe those images. This is a major part of optimizing image SEO.
One of the best ways to help search engines and your users find these images is by giving them a meaningful filename. For example, a file name like newyork-skyline.jpg is a lot more helpful than DSC00789.jpg.
Now the problem is that a lot of users upload images directly from their phones or cameras. Some users download images from other sources and forget to rename them before the upload.
Once you have uploaded those images to WordPress, there is no default option to rename those images or any media files.
Having said that, let’s take a look at how to easily rename images and media files in WordPress.
Renaming Images and Media Files in WordPress
This method does not automatically change the image file name in WordPress. However, it does allow you to manually change an image filename inside the WordPress admin area.
The first thing you need to do is install and activate the Phoenix Media Rename plugin. For more details, see our step by step guide on how to install a WordPress plugin.
Upon activation, simply go to Media » Library. If your media library is displayed in the grid view, then you will need to switch to the list view.
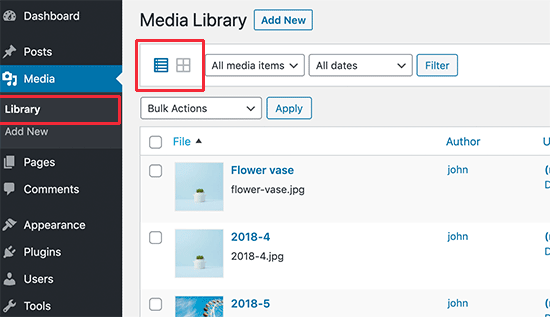
This will allow you to view more details for each media file including the file name.
Next, you need to click on the ‘Edit’ link below the image or media file that you want to rename.
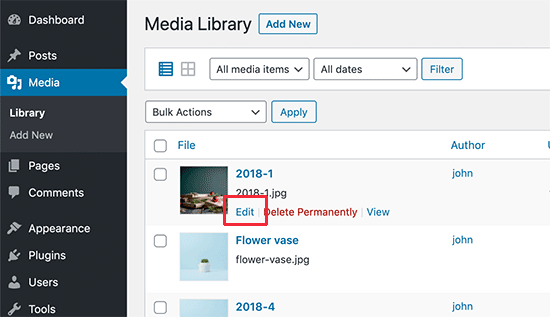
This will open your image in the WordPress media edit screen. From here, you can edit details of an image like Alt tag, caption, and more.
Scroll down to the bottom and you’ll see the filename field.
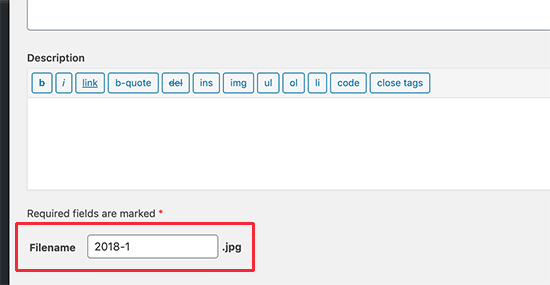
From here, you can change the file name. We recommend giving it a keyword-focused and meaningful name that actually describes the image. We recommend only using all lowercase letters and dashes between two words.
After that, click on the ‘Update’ button to save your changes.
That’s all. You have successfully renamed the media files without leaving the WordPress admin area. The plugin will also update the file name if you have used the image in a post or page.
Replace Image and Media Files in WordPress
If the above method does not work you, then you can try this method. Basically, you’ll download the file to your computer and rename it there.
After that, you’ll replace the original file on your website with the renamed version by using a plugin.
The first thing you need to do is install and activate the Enable Media Replace plugin. For more details, see our step by step guide on how to install a WordPress plugin.
After that, visit Media » Library page. If you are using the grid-view, then you would need to switch to the list view.

You will now see a new link to replace the media below each item in your media library.
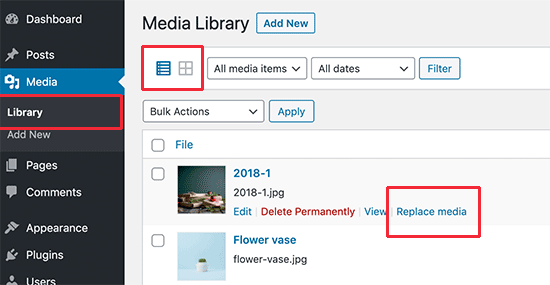
This will bring you to the replace media page.
First, you need to choose the file from your computer that you want to upload and replace the old file with. Make sure that you have already changed the file name on your computer.
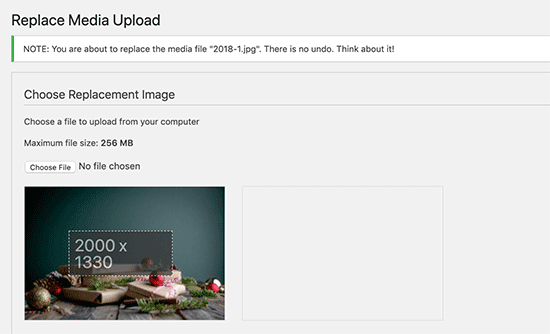
After that, you need to scroll down a little for more options.
Under replacement options, you can choose whether you just want to replace the file or also want to replace all the links. We recommend using the second option if you have already added that file to your WordPress posts and pages.
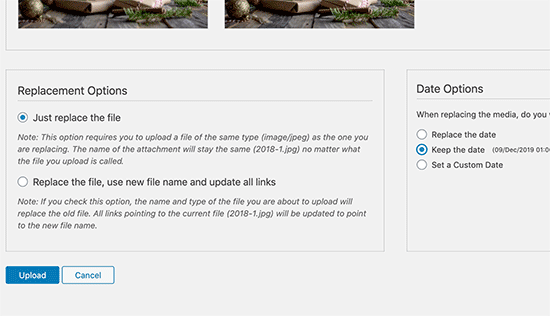
You can also choose to keep the old date or use a new date.
Finally, click on the ‘Upload’ button to replace the old media file with the new and renamed file.
We hope this article helped you learn how to easily rename images and media files in WordPress. You may also want to see our article on best WordPress image compression plugins compared.
If you liked this article, then please subscribe to our YouTube Channel for WordPress video tutorials. You can also find us on Twitter and Facebook.
The post How to Rename Images and Media Files in WordPress appeared first on WPBeginner.
from WPBeginner https://ift.tt/38GEM2G
via Webtricks Online


0 Comment to "Webtricks Online | How to Rename Images and Media Files in WordPress"
Post a Comment