Do you wish to track the WordPress category and tag analytics? By default, most website analytics solutions tell you about your most popular posts and pages, but very few show any information about your archive pages like categories and tags.
Category and tag pages can be an important source of traffic. This is why you need to track them properly, so you can better understand their impact.
In this article, we will show you how to easily track WordPress category and tag analytics.
Why Track Category and Tag Analytics in WordPress
WordPress category and tags can be an important source of traffic when used properly.
Categories are your website’s main topics. For example, on a travel website, these could be food, tours, accommodation, etc.
On the other hand, tags are specific topics discussed inside an article. For example, coffee shops, free tours, budget hotels, etc.
To learn more, see our complete guide on category vs tags and SEO best practices to use them for maximum benefit.
By default, category and tag pages are indexed by search engines which brings you additional traffic. You will need to learn which category and tags are getting more traffic, and what you can do to improve them.
That being said, let’s take a look at how you can easily track categories and tags in WordPress.
Setting up Google Analytics with MonsterInsights
For this guide, we will be using Google Analytics with MonsterInsights.
MonsterInsights is the best Google Analytics plugin for WordPress. It allows you to easily install Google Analytics and track your website traffic.
The first thing you need to do is install and activate the MonsterInsights plugin. For more details, see our step by step guide on how to install a WordPress plugin.
MonsterInsights is a paid plugin. You’ll need at least their Pro plan to access custom dimensions addon which we will be using for this tutorial.
Next, you need to visit Insights » Settings and scroll down to click on the ‘Launch Setup Wizard’. This will start the MonsterInsights setup, and you just need to follow the on-screen instructions to connect your WordPress site to your Google Analytics account.
For detailed instructions, see our guide on how to install Google Analytics in WordPress.
After that, you need to go to Insights » Addons page and install the Dimensions addon.
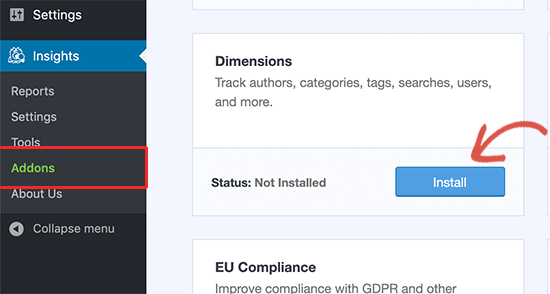
MonsterInsights will install and activate the Dimensions addon.
You are now ready to setup category and tags tracking in WordPress.
Adding Custom Dimensions in MonsterInsights for Categories and Tags
MonsterInsights allows you to set dimensions. These are custom parameters that you can use to track different elements on your website using Google Analytics.
First, you need to visit Insights » Settings page and then switch to the ‘Conversions’ tab. Scroll down to the ‘Custom Dimensions’ section and click on the ‘Add New Custom Dimensions button.
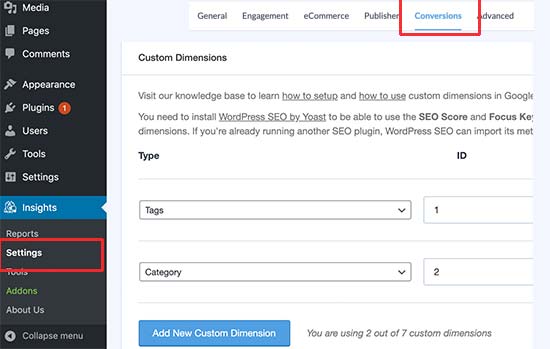
Next, you need to select ‘Tags’ and then click on the button again to add ‘Category’ custom dimension.
Click on the ‘Save Changes’ button at the top to store your changes.
Adding Custom Dimensions in Google Analytics
Now that you have set up custom dimensions in MonsterInsights, the next step is to do the same in Google Analytics.
Open your Google Analytics dashboard and switch to the All Website Data view.
From there, you need to click on the ‘Admin’ button at the bottom left corner of the screen and then select ‘Custom Definitions » Custom Dimensions’ under the Property column.
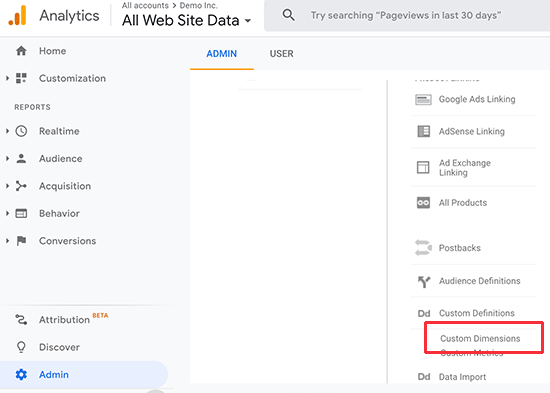
Next, you need to click on the ‘+ New Custom Dimension’ button and add ‘Category’. Google will then show you a code example, but you can ignore it and click on the Done button. Repeat the process to add ‘Tags’ as well.

You also need to make sure that custom dimensions IDs and Index values match in Google Analytics and MonsterInsights.
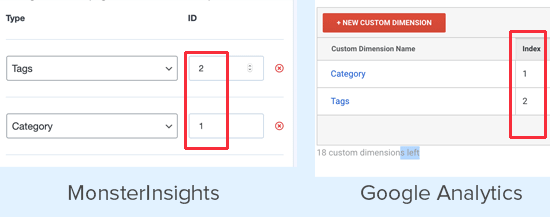
That’s all you have set up category and tag tracking in Google Analytics using MonsterInsights.
Viewing Category and Tags Reports in WordPress
After your website has collected some traffic data, you can view your category and tags tracking reports inside the WordPress dashboard.
Simply go to Insights » Reporting page and switch to the Dimensions tab.
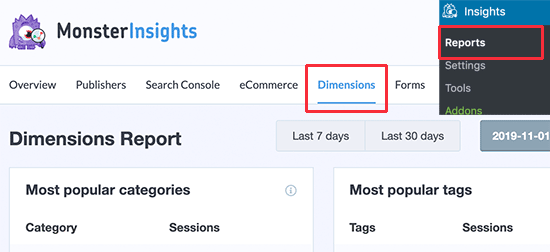
You’ll see a list of your most popular categories and tag pages listed there.
How to Improve Your Category and Tag Pages in WordPress
Now that you have started tracking your category and tag pages, you would want to improve them, so that you can get even more traffic to your website.
Following are a few easy-to-implement tips that you can use to improve your category and tag archive pages.
1. Use Excerpts Instead of Full Posts
By default, WordPress displays full posts on your category and tag archive pages. Some WordPress themes provide a solution for that by allowing you to choose between full posts vs summary.
You can also do that on your own. Simply install and activate the Advanced Excerpt plugin. For more details, see our step by step guide on how to install a WordPress plugin.
After that, go to Settings » Excerpt page and scroll down to Display on section. From here, you can select excerpt length and style options for your excerpts.
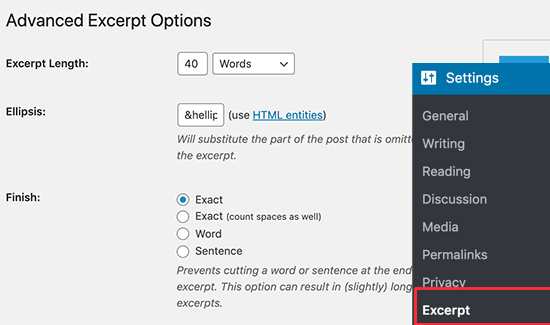
Don’t forget to click on the save changes button to store your settings.
That’s all your WordPress categories and tag pages will now show excerpts instead of full posts.
2. Add Category and Tag Descriptions
Just like your posts and pages, you can also add descriptions for your category and tag archive pages. Simply go to Posts » Categories page and click on the Edit link below a category.
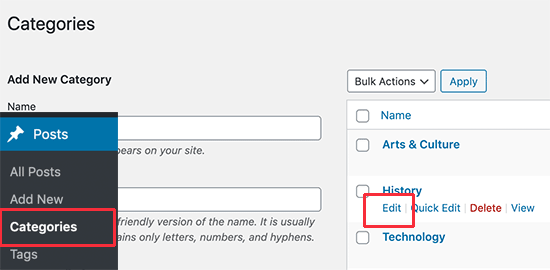
This will open the category editor screen. From here, you can edit category name, slug, and provide a description of what kind of articles users will find under this category.
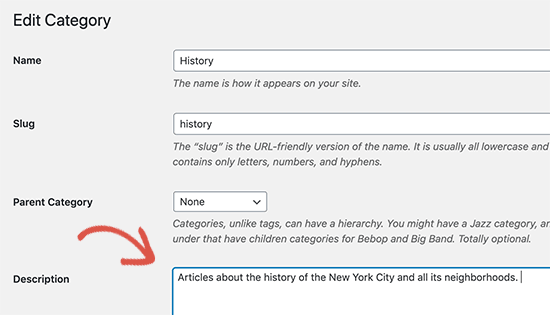
You can now save your changes and visit the category page to see the description in action.

Repeat the process to add descriptions for all your category and tag pages.
Note: All top SEO plugins will automatically use your category description as meta description for category pages.
3. Add Category and Tag Icon Images
By default, all categories and tag pages look quite similar to each other. You can add an image to your category tag page to make them stand apart and look more interesting.
See our tutorial on how to add taxonomy images in WordPress for detailed instructions.
We hope this article helped you learn how to easily track WordPress category and tag analytics. You may also want to see our article on essential website marketing data you must track on all websites.
If you liked this article, then please subscribe to our YouTube Channel for WordPress video tutorials. You can also find us on Twitter and Facebook.
The post How to Track WordPress Category and Tag Analytics (Easy Way) appeared first on WPBeginner.
from WPBeginner https://ift.tt/2StWHDY
via Webtricks Online


0 Comment to "Webtricks Online | How to Track WordPress Category and Tag Analytics (Easy Way)"
Post a Comment