Do you want to know how your site will perform in case of a traffic surge?
Stress testing a WordPress website will show how your website will perform under different situations. This way, you can ensure fast performance and resolve any issues.
In this article, we will show you how to stress test a WordPress website.
What is a WordPress Stress Test?
A WordPress stress test lets you see how your website will perform in high-traffic situations. It helps you prepare for spikes in traffic and see how your site handles the load.
Usually, the amount of traffic a website can withstand is determined by your WordPress hosting plan. However, stress testing helps find these limits and uncovers issues that might occur due to high traffic.
For instance, a sudden spike in traffic can cause your site to crash and utilize all the server resources. Similarly, you can also see which WordPress plugins, themes, code snippets, and images malfunction in extreme conditions.
With stress testing, you can easily fix any issues or correct a setting that might be misconfigured. As a result, you’ll offer a better user experience and be prepared for high-traffic situations.
That said, let’s see how to stress test a WordPress website.
Stress Testing a WordPress Website
When it comes to measuring the performance of your WordPress website, you’ll find lots of speed test tools, like PageSpeed Insights, Pingdom, or GTmetrix.
While these tools help find out how fast your site loads, they don’t tell you how a website will perform under high traffic.
To stress a WordPress site, we’ll be using Loader.io for this tutorial. It is a free tool that simulates high-traffic situations and performs a series of tests.
Sign Up for a Free Loader.io Account
First, you’ll need to visit the Loader.io website and create a free account. Simply click the ‘Sign Up Now’ button to get started.

After that, you will see different pricing plans offered by the tool.
Go ahead and select the ‘Free’ pricing plan.

Next, you can enter details to sign up for a new account.
Loader.io will ask for a company name, email address, and password. Once you’ve added these details, simply check the reCaptcha box and click the ‘Sign Up’ button.

You also receive a verification email. Simply check your inbox and click the link in the email to verify your account.
Adding a New Host to Loader.io
After that, you can set up a target host by clicking the ‘+ New Host’ button.
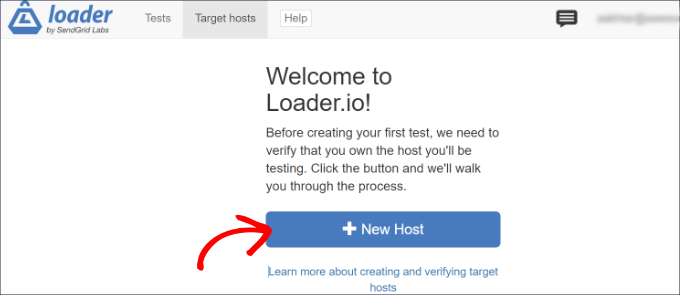
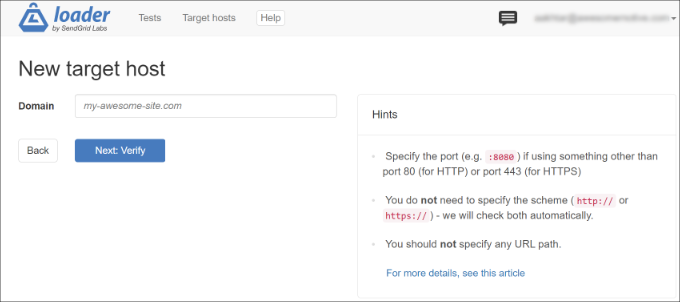
Next, you’ll need to enter your domain name.
Once that’s done, simply click the ‘Next: Verify’ button.
Next, you will need to verify your domain. You can do this by verifying over HTTP or DNS.
For this tutorial, we will use the ‘Verify over HTTP’ option and download the verification file. Go ahead and click the ‘download’ link and save the file on your computer.
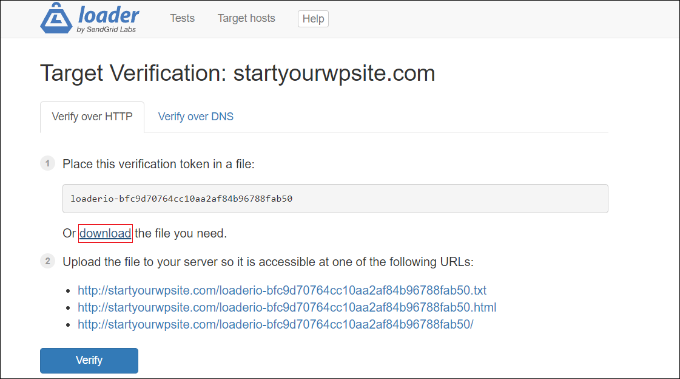
After downloading the file, you’ll need to upload it to your site’s root folder. This is usually called the ‘public_html’ folder.
To upload the file, you can use an FTP client. For more details, please see our guide on how to use FTP to upload files to WordPress.
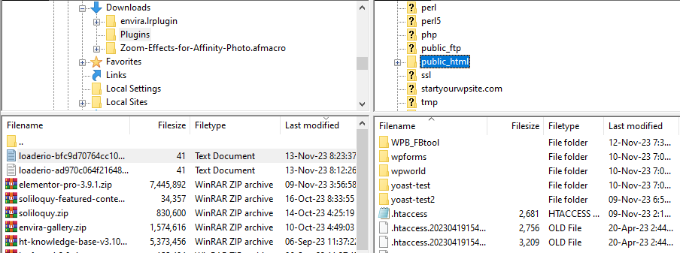
After uploading the file, you can return to the Loader.io website and click the ‘Verify’ button.
Upon verification, you should see a success message.
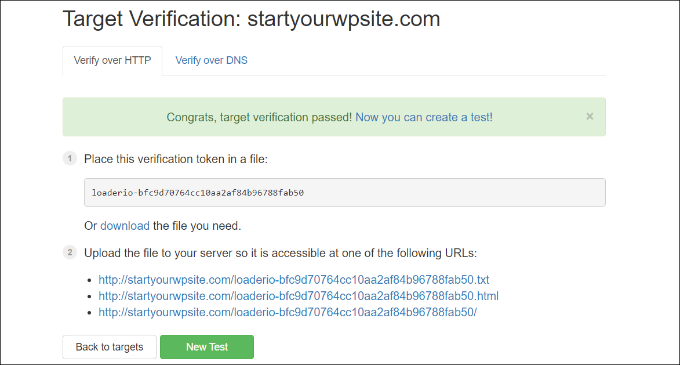
Next, you’ll need to click the ‘New Test’ button and set up a stress test for your website.
Configuring Your Stress Test Settings
On the next screen, you can change the settings for your stress test. You can start by adding a name for your test.
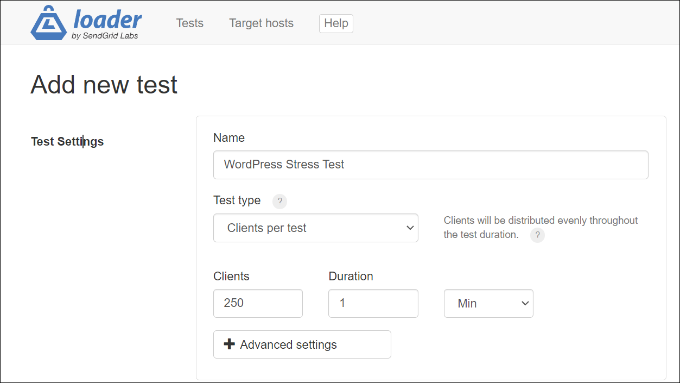
After that, you’ll need to select the test type. Loader.io offers 3 test types, which include:
- Clients per test – In this, you can test how your site will work when a specific number of visitors visit your site for a specified amount of time. You can set the number of clients and the duration.
- Clients per second – This scenario will test your site for a specified number of client requests per second.
- Maintain client load – Under this test type, a constant client count is maintained throughout the duration of the test. It stress tests your site when there is a constant load for a specific time.
We would recommend running multiple tests using each of these types. This will help uncover any issues that your site might encounter under different scenarios.
If you scroll down, then you’ll see Client Requests settings. For general testing, we recommend using the default settings and you don’t need to change anything.
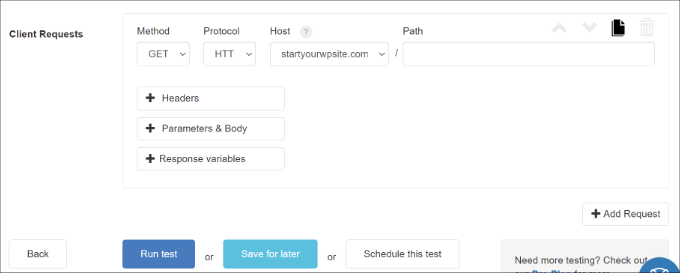
Now, you’re ready to stress test your WordPress site. Go ahead and click the ‘Run test’ button.
Analyze Your Stress Test Results
Loader.io will run the stress test for your website and compile the results. You can then analyze them to see how your site performs under high-traffic situations.
For instance, you can start by looking at the average response time. The lower the response time, the faster your website’s loading speed.
In our testing, the average response time was 590 milliseconds or 0.59 seconds when 250 clients visited the site for 1 minute.

This is fairly decent reading and shows that the website didn’t slow down considerably under high load.
However, the maximum response time recorded was 10489 ms or 10.489 seconds. You can now look at the graph below to see when the response time jumps compared to the number of clients.
For instance, our testing showed that there was a spike when the number of clients exceeded 150 and the maximum response time was seen when the number of clients almost reached 200.
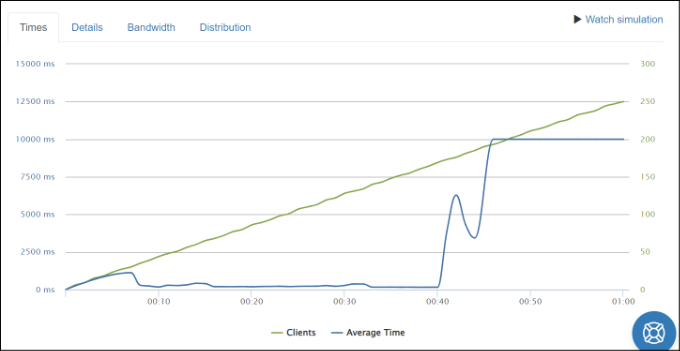
Using these insights, you will have a rough idea of how your site will perform when a certain number of people visit it.
You can now repeat this step and run multiple tests using different scenarios. For instance, try increasing the number of clients, testing the duration, and use different test types.
Tips to Improve Response Time & Boost Performance
If WordPress load tests show slow performance under high-traffic situations, then you can try different things to speed up your site.
Here are some tips for improving response time and handling high traffic load:
1. Upgrade Your WordPress Hosting Plan – If you’re using a hosting plan that has limits on the number of visitors per month, then consider upgrading to a higher hosting plan. This way, you’ll get more server resources and your site can handle extra traffic when there is a spike. You can also see our detailed comparison of the fastest WordPress hosting services to learn more.
2. Use a Caching Plugin – A caching plugin reduces the load on your site’s server and helps improve performance. It serves a static version of the site to users instead of going through the entire process of requesting a webpage. As a result, your site loads faster and you provide a better user experience.
3. Set Up a Content Delivery Network (CDN) – A CDN is a network of servers that deliver cached static content to users based on their location. It helps lower the load on your site server and improve the response time.
4. Optimize Your Images and Videos – Unoptimized images can lead to performance issues on your site and increase load on the server. To start, you can compress large image files to lower response time. If you’re hosting videos on your site, then consider uploading them to YouTube or Vimeo and embedding them in your content.
5. Remove Unused Plugins and Themes – If you have WordPress plugins and themes that are not in use or are resource-heavy, then consider removing them. They can slow down your WordPress site by loading unused scripts and utilizing a lot of server resources.
For more tips on improving your site’s performance, please see our guide to boost WordPress Speed and Performance.
We hope this article helped you learn how to stress test a WordPress website. You may also want to see our guide on the most common WordPress errors and how to fix them, and ultimate guide to WordPress SEO.
If you liked this article, then please subscribe to our YouTube Channel for WordPress video tutorials. You can also find us on Twitter and Facebook.
The post How to Stress Test a WordPress Website (2023) first appeared on WPBeginner.
from WPBeginner https://ift.tt/JhVPNXr
via Webtricks Online


0 Comment to "Webtricks Online | How to Stress Test a WordPress Website (2023)"
Post a Comment