Do you want to add a preloader to your WordPress site? A preloader is an animation indicating the progress of a page load in the background.
Preloaders assure users that the website is working on loading the page. This can help improve user experience and reduce overall bounce rate.
In this article, we’ll show you how to easily add a preloader to WordPress.
What is a Preloader and When You Should Use it?
A preloader is an animation or status message indicating the progress of page load in the background.
Normally when you visit a website, your browser starts downloading different parts of the content. Some parts of the website load faster (i.e. text, HTML code, CSS) whereas others load way slower (i.e images and videos).
If most of your content is text with very few images and videos, then you don’t really need to add a preloader to your website. Instead, you should focus on improving website speed and performance for faster page loads.
On the other hand, if most of your content is images, photographs, and video embeds, then your users need to wait a while before they can actually see all the content.
During these partial downloads, your website may feel slow. Sometimes users may even think that it is broken. Adding a preloader, fills this gap and shows the user a progress indicator during the page load.
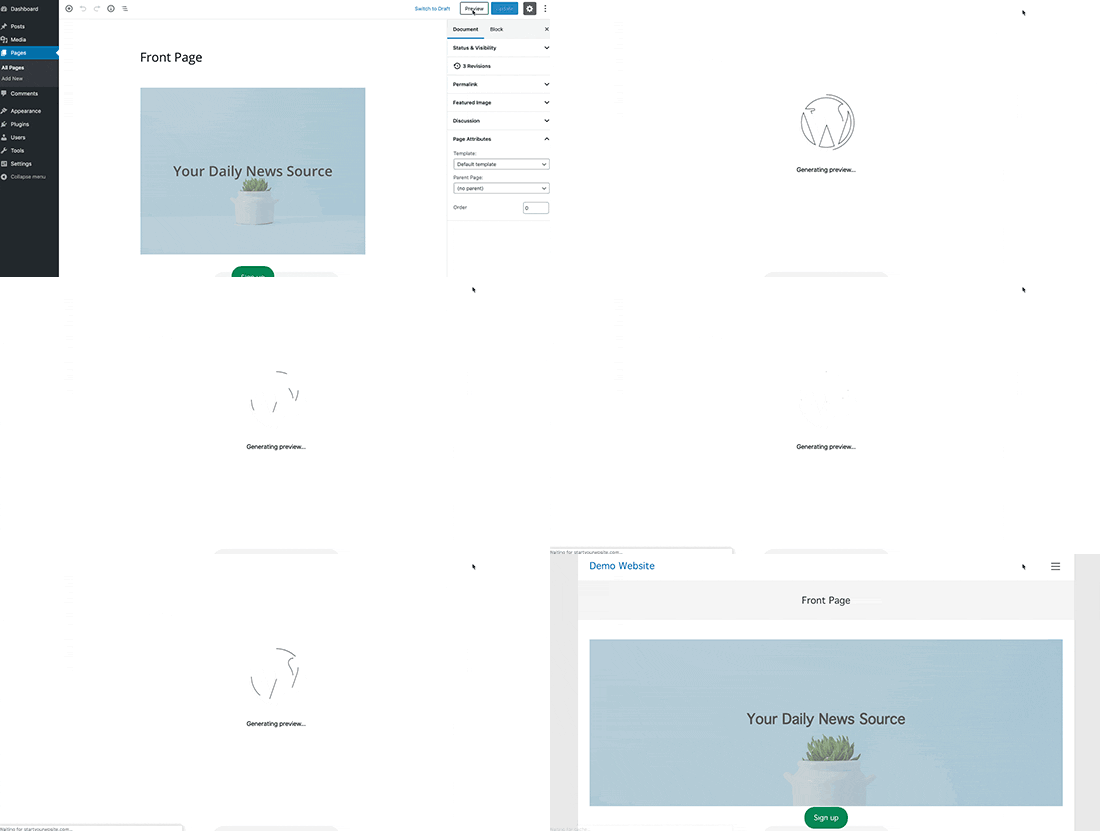
You can see a live example of a preloader by clicking on the Preview button while writing a blog post in WordPress.
WordPress will open a live preview of your blog post in a new window, and it will display a preloader before it actually shows the live preview.
That being said, let’s take a look at how you can easily add a preloader to your WordPress website.
Method 1. Adding a Preloader in WordPress using WP Smart Preloader
This method is recommended because it is easier to implement and does not require any changes to your WordPress theme.
First thing you need to do is install and activate the WP Smart Preloader plugin. For more details, see our step by step guide on how to install a WordPress plugin.
Upon activation, you need to visit Settings » WP Smart Preloader page to configure plugin settings.
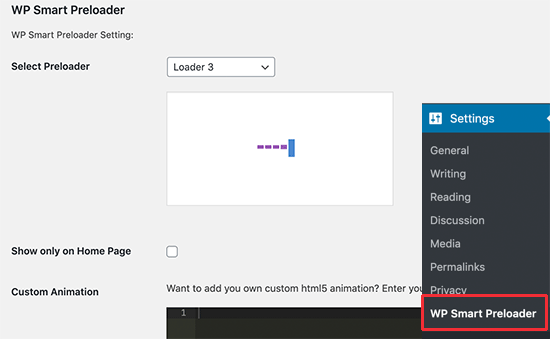
First, you need to choose a preloader style or page load animation. The plugin comes with six built-in animations to choose from. You can also upload your own custom HTML and CSS to create a custom preloader.
After that, you can make the preloader appear only on the homepage by checking the ‘Show only on Home Page’ option.
Next, you need to scroll down to the ‘Duration to show Loader’ section. You need to specify the duration for the preloader. The default option is 1500 milliseconds (1.5 seconds) which should work for most sites, but you can change that if you want.
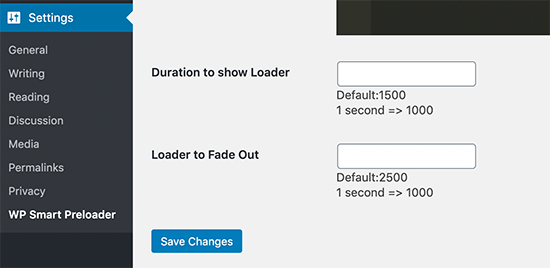
You can also set the time loader takes to completely fade out. The default option is 2500 seconds or 2.5 seconds.
Finally, don’t forget to click on the ‘Save changes’ button to store your settings.
You can now visit your website to see the preloader in action.

Method 2. Adding a Preloader in WordPress using Preloader Plugin
This method is flexible but requires additional steps to properly implement it on your WordPress site.
The first thing you need to do is install and activate the Preloader plugin. For more details, see our step by step guide on how to install a WordPress plugin.
Upon activation, you need to visit the Plugins » Preloader page to configure plugin settings.
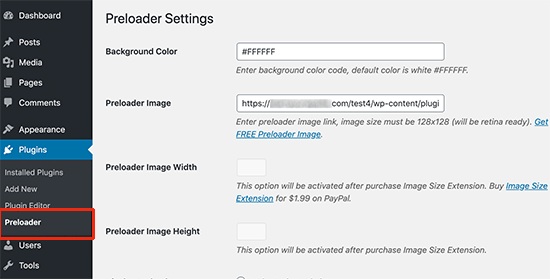
First, you need to enter the Hex code for the background color you want to use for the loading screen. The default option is #FFFFFF (white). You can use an online color picker tool to find the HEX code for the color you want to use.
Next, you need to provide the URL of the preloader image you want to use. The plugin comes with a default animation image.
If you want to use other animation, then you’ll find a link to download an animated preloader image from a third-party website. You can then upload that image to your wp-content folder and paste the URL here.
Next, you need to choose where you want to display the preloader.
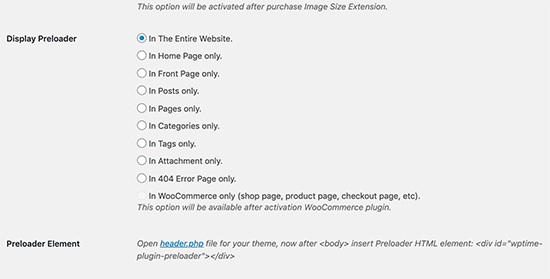
You can choose to display it on all pages of your website, or you can select a specific section.
Finally, you will see the instruction to add the following code to your WordPress theme’s header.php file.
<div id="wptime-plugin-preloader"></div>
Before you leave the page, don’t forget to click on the ‘Save changes’ button to store your settings.
We don’t recommend adding code to your WordPress theme because it will get wiped off when you update the theme.
If you are using a child theme, then it is ok to add the code to your child theme’s header.php file.
An even better solution would be to add this code using a separate Code Snippets plugin, or in a site-specific plugin.
Here’s the code you’d need to add:
function wpb_add_preloader() {
echo '<div id="wptime-plugin-preloader"></div>';
}
add_action( 'wp_body_open', 'wpb_add_preloader' );
Note: this method of adding code will only work on WordPress themes that are compatible with the wp_body_open() function added in WordPress 5.2.
This method of adding the code makes sure that your code stays there even if you update the theme.
Once you have added the code, you can visit your website to see the preloader in action.

We hope this article helped you learn how to easily add a Preloader to your WordPress site. You may also want to see our list of the most useful WordPress tips, tricks, and hacks for more cool ideas.
If you liked this article, then please subscribe to our YouTube Channel for WordPress video tutorials. You can also find us on Twitter and Facebook.
The post How to Add a Preloader Animation to WordPress (Step by Step) appeared first on WPBeginner.
from WPBeginner https://ift.tt/2Ee1MYJ
via Webtricks Online


0 Comment to "Webtricks Online | How to Add a Preloader Animation to WordPress (Step by Step)"
Post a Comment